6 min read
In the automation industry we are constantly looking for ways to improve our efficiency, streamline processes, and minimize errors to keep up with today’s expanding digital world. Part of our solution is to eliminate repetitive tasks and automate testing. One helpful tool is to automate reading and writing PLC tags via Excel.
There are a number of different uses for a tool like this including:
- Batch Read and Write of Recipe Parameters: If your application uses a PLC-based recipe management system, then you may have quite a number of recipe parameters to load. An Excel-based tool will help in the creation and documentation of these recipes.
- System Setpoints: If you need to document your system setpoints or tuning parameters, you can use an Excel-based tool to read and preserve the as-designed state of your configuration.
- Device Parameters: OEMs produce different versions of their equipment, sometimes using the same PLC configuration with different device parameters that tell the program how to act. An Excel-based tool could be used to quickly and efficiently set the device parameters on these systems, potentially eliminating problems with manual field setup.
- PLC Migration: You can read values from one PLC and then easily write those values to a new target PLC, thereby eliminating potential manual transfer errors.
This blog will demonstrate how to use Microsoft Excel and Rockwell Automation’s RSLinx Classic software to “read” and “write” a Rockwell PLC’s tags. This process works for BOOL, DINT, INT, STRING, and FLOAT data types.
Let’s get started.
Pre-requisites
- Verify the PLC is in the rack, powered on, and on the same network as your PC.
- Verify the PLC program has been downloaded to the controller and go-online.
- Verify Microsoft Excel and Rockwell RSLinx Classic are installed on your PC.
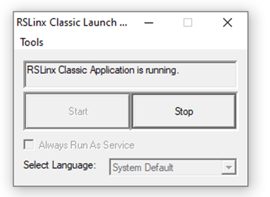
- Ensure RSLinx is running as an application. To confirm if RSLinx is running as a service or as an application, simply open the RSLinx Classic Launch Control Panel application. If it is not running, make sure to uncheck the Always run as a service check box, and then click Start. If it is running as a service, click Stop and then follow the directions from above to have RSLinx run as an application instead.
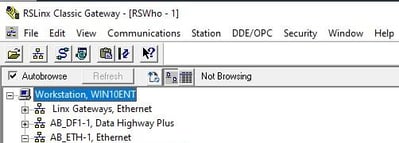
- RSLinx Classic Gateway, OEM, and Single Node all work for this process. RSLinx Classic Lite does not support DDE/OPC connections and cannot be used for this method. Check the title bar of RSLinx Classic to verify your version. For this example, RSLinx Classic Gateway is running.
Configure the DDE / OPC topic in RSLinx
From RSLinx, click the DDE/OPC tab located in the navigation bar and click Topic Configuration in the dropdown option. 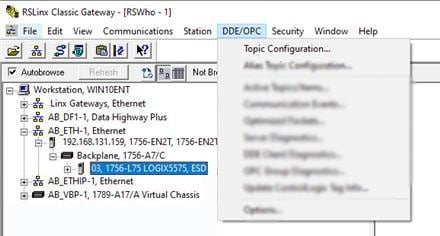 A new window will open called DDE/OPC Topic Configuration. Click the New button located in the bottom left corner and assign the topic a name (e.g. Excel_Topic).
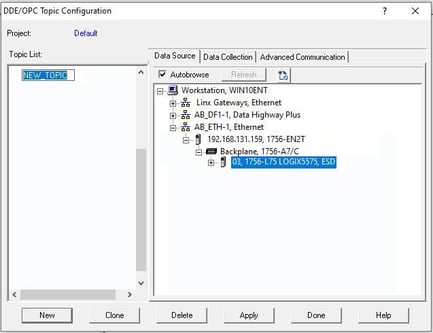
Select the newly created topic and navigate to the processor on the right-hand side of the window and click Apply. A popup will appear to confirm the update to the topic. Select Yes to complete the configuration of the topic in RSLinx.
Excel Setup
Open Microsoft Excel and create a sheet named “REFS.” This sheet will contain the topic name (or names) that were setup in RSLinx as well as some data formatting information that will be used later for the PLC writes. In this example, enter the name of the configured topic, above, in cell A2 (“Excel_Topic”). Put the data formatting placeholders in the cells shown below as well.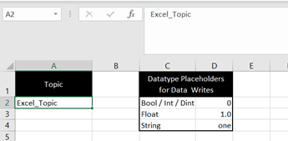
Populate the list of Controller Tags
Create a second sheet in the Excel workbook named “DATA” with columns for “Tag,” “Value”, and “New Value.” Next, enter the controller tag names (including the extensions for UDT/AOI types) in the “Tag” column as shown below. 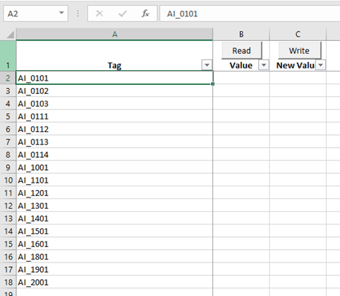
Note: For program-scoped tags, use the syntax: "Program:<program_name>.<tagname>".
Create the "Read” Button
The Read button will execute a script that pulls the value of a tag into Excel. In this example, the script will refresh the data in the value column, by querying the tag names in the first column.
- From the Developer tab in Excel, enter “Design Mode."
- Create a button labeled “Read” and place it in the header of the “Value” column.
- Create a Macro with the code below:
Sub ReadData_Click() Dim row, rowLast, connResult As Integer Dim tagName, topic As String 'Open the Connection to the PLC topic = Worksheets("REFS").Range("A2") connResult = DDEInitiate("RSLinx", topic) 'Verify that the Connection was made If Err.Number <> 0 Then MsgBox "Error Connecting to PLC", vbExclamation, "Error" connResult = 0 End If 'Determine the number of the last row in column 'A' of the I/O List Sheet rowLast = Cells(Rows.Count, "A").End(xlUp).row 'Scroll through the list of tags For row = 2 To rowLast tagName = Cells(row, 1).Value Cells(row, 2) = DDERequest(connResult, tagName + ",L1,C1" + Chr$(34) + ")") If Err.Number <> 0 Then MsgBox "Error Reading from PLC", vbExclamation, "Error" connResult = 0 End If Next row 'Sever the PLC Connection DDETerminate (connResult) End Sub - Assign the “ReadData_Click()” Macro to the "Read” button.
Create the "Write” Button
The Write button
- Create a button labeled Write and place it in the header of the “New Value” column.
- Create a Macro with the code below:
  Sub WriteData_Click()
      Dim row, rowLast, connResult As Integer
      Dim tagName, topic As String

      'Open the Connection to the PLC
      topic = Worksheets("REFS").Range("A2")
      connResult = DDEInitiate("RSLinx", topic)

      'Verify that the Connection was made
      If Err.Number <> 0 Then
          MsgBox "Error Connecting to PLC", vbExclamation, "Error"
          connResult = 0
      End If

      'Determine the number of the last row in column 'A' of the I/O List Sheet
      rowLast = Cells(Rows.Count, "A").End(xlUp).row

      'Scroll through the list of tags
      For row = 2 To rowLast
          tagName = Cells(row, 1).Value
          Data = Cells(row, 3).Value

          'When the macro runs, the DATA tag resolves to a specific data type
          ' (Integer, float, string, etc).
          'To use mix types, evaluate the info being passed, and write the value
          ' to a tag of the appropriate data type.
          If IsNumeric(Data) Then
              If Int(Data) = Data Then
                  XmitInt = CLng(Data)
                  Worksheets("REFS").Cells(2, 4) = Data
                  DDEPoke connResult, tagName, Worksheets("REFS").Cells(2, 4)
              Else
                  XmitReal = CSng(Data)
                  Worksheets("REFS").Cells(3, 4) = Data
                  DDEPoke connResult, tagName, Worksheets("REFS").Cells(3, 4)
              End If
          Else
              XmitString = CStr(Data)
              Worksheets("REFS").Cells(4, 4) = Data
              DDEPoke connResult, tagName, Worksheets("REFS").Cells(4, 4)
          End If

          If Err.Number <> 0 Then
              MsgBox "Error Writing to PLC", vbExclamation, "Error"
              connResult = 0
          End If
      Next row

       'Sever the PLC Connection
      DDETerminate (connResult)
  End Sub
- Assign the “WriteData_Click()” Macro to the "Write” button.
- From the Developer tab in Excel, exit “Design Mode."
Reading and Writing Tag Values
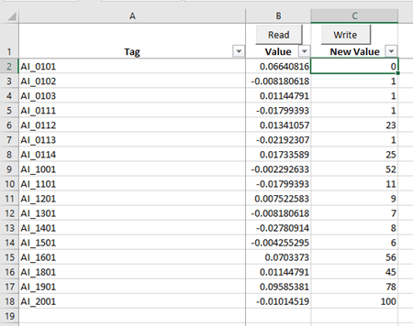
When the setup and configuration process is complete, press the “Read” button to display the values of the PLC tag in the “Value” column.
On the same “DATA” sheet, enter the desired value in the "New Value" column for each tag in column A. Press the “Write” button to update the tag values in the PLC.
Note: For BOOL tags, use '1' and ‘0’ and not 'True' and 'False'.
Now that it’s in Excel…
The example above is functional and may suit your needs. Since the connection is being made with Excel, there are many opportunities to customize the formatting, scripting, and layout to fit your use case.
While you are here, check out our other blog on how to use excel to create ladder logic within for your Rockwell Logix controller.
Related Posts
Five Recommendations for Improving Pharmaceutical Data Integrity
In the pharmaceutical industry, every part of the production process – from the amount of each...
How to Communicate Modbus Natively with ControlLogix
The Modbus protocol was originally published in 1979 by Modicon as a simple request-response...
Your Guide to Integrating Modbus TCP/IP Devices into PCS 7
Today, most modern control systems consist of a variety of hardware and field devices using a range...